Thursday, April 23, 2015

Unity Tips: Working with Animations (Part 2)

Once you know how to hook up models to an Animator Controller, covered in Part 1, you can move on to some more sophisticated work with animations. These are still beginner tricks, but past the "OMG It won't move T_T" stage.

____________________________________________________________


We'll be covering three major tricks I've learned.

  • Animator Controllers
    • Transition Parameters
    • Transition Blending
  • Individual Animations
    • Animation Events


____________________________________________________________

Animator Parameters and Transitions

[Animator Documentation]

Animator Controller transitions are totally awesome. These allow you to make complex but comprehensible animation systems.

Parameters

[Parameter Documentation]
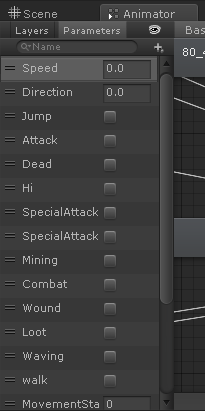
If you're used to working with the Legacy system, these will be quite comfy. Parameters are bools, ints, floats, and triggers that you can assign to an animation transition and set with scripting.

To set up a parameter, open your Animator window. At the top, you'll see two tabs. Layers and Parameters. Simple enough, click over and add your first. I tend to work mainly with bools, but floats are very useful for speed-based transition amd ints can be used/set by switch-type scripting but the discretion is really up to you.

An example of this set up is
  • bool - InCombat
  • bool - Attacking
  • bool - GetHit
To change these, you want a script that looks something like this:

public GameObject me;
public Animator anim;

public bool Combat;

void Start() {
        me = this.gameObject;
        anim = me.GetComponent<Animator>();
}

void Update() {
        if (Combat) {
                anim.SetBool("InCombat", true);
        } else 
                anim.SetBool("InCombat", false);
        }
}

And so on like that with all the types. This allows you to control your animation transitions through your own scripting, rather than just watching a loop of default transitions.

____________________________________________________________

Transitions - The Line
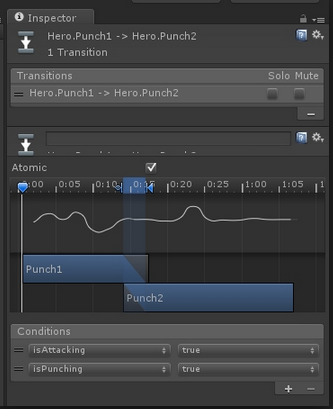
These are, of course, the heart of Animator Controller.
To make a transition:

  • Right-click on starting animation in Animator. Select "Make Transition".
  • Now click on the animation you want to transition to.
The next part is cool. Now click on the Line-with-an-arrow that was created. This is your transition.
In the Inspector, you'll see the details of the transition. These settings determine the when and how of the transition. There are two tricks in this display I'm going to cover.

____________________________________________________________

Conditions
The first is Conditions, seen at the bottom. This is where we use your Parameters. Click the +
Now you've got a drop-down menu including any Parameters you've created, and options as to what conditions the parameter must be in to trigger the transition.

So to trigger a transition into combat from the previous example:
  1. Lick Parameters in your Animator and then click the +
  2. Create a bool called InCombat
  3. Place Idle and Combat Idle animations into your Animator
  4. Right click on Idle and select "Make Transition"
  5. Click on Combat Idle. You'll see the arrow pointing from Idle to Combat Idle
  6. Click on the arrow/line to see the info in the Inspector
  7. Click the + under Conditions and select "InCombat". Set the condition to "true"
  8. Now create a transition from CombatIdle to Idle
  9. Set this transition's Condition to "InCombat" and "false"
Now, when your script says you're in combat, your animation will change from Idle to Combat Idle. When you leave the combat state, your model will relax back into their Idle animation.

____________________________________________________________


Transitions - The Details
The second item in the Transition Inspector is blending. I'm not actually sure what the official Unity term is, but I'm talking about that little blue and gray chart-thing.
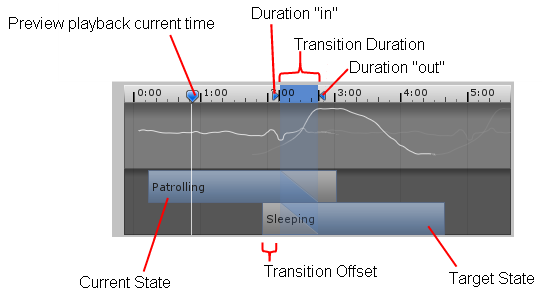
This is well worth playing around with. The first bar is clearly your starting animation, and the second the one you're transitioning into. The blue bit covers what your model actually performs

In application, I've found many animations start with the model standing still for a second or two before acting. By having the transition start later in the animation, you can skip bits that are not useful to you.

Second common application: Free animations often come in roughly cut samplers. If you want a particular action that happens in the middle/end of your animation clip, just slide that lower bar over.

____________________________________________________________

Animation Events

Animation events allow you to trigger script functions at certain points in the animation without having to count seconds.

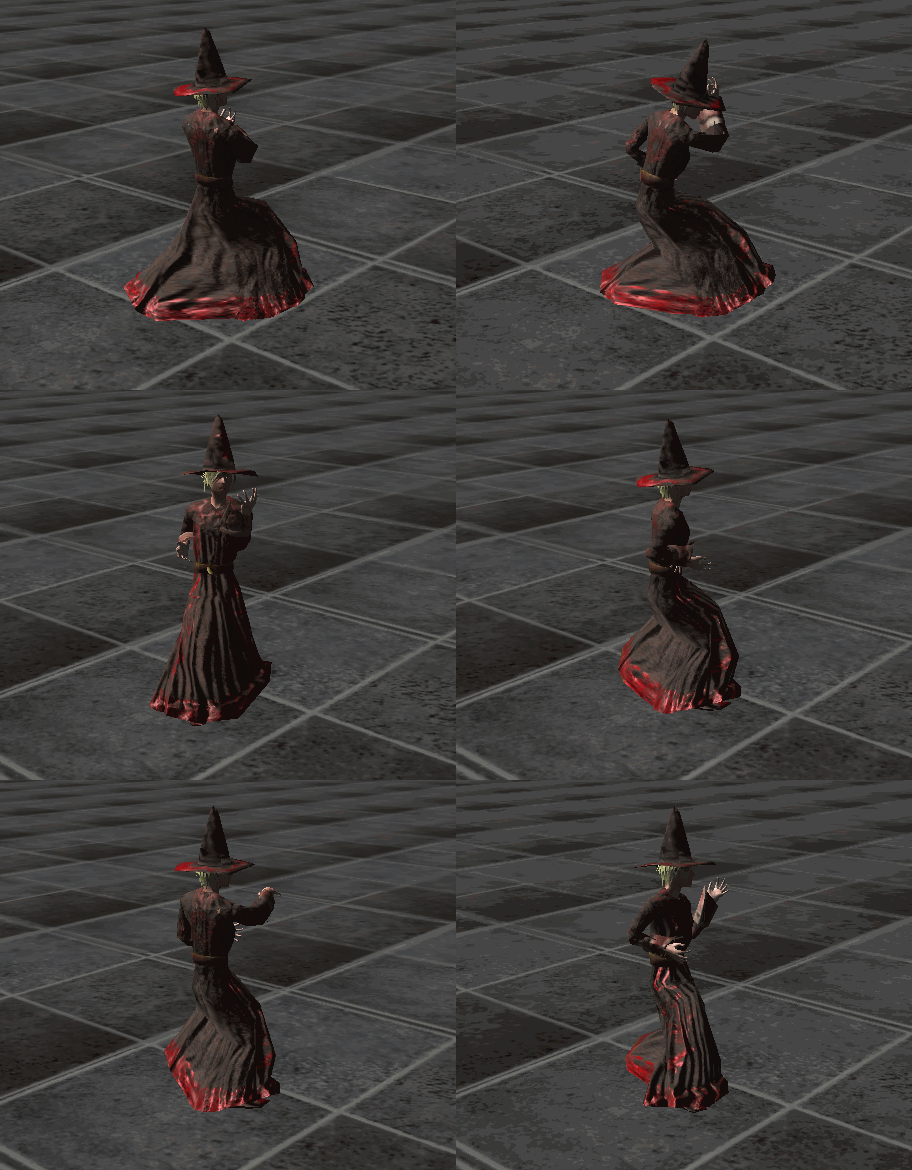
This sequence was accomplished with a super cool trick I just learned called Animation Events.
To find this option:
  • Place your model in a scene and select
  • Open your Animation window (Window-->Animation)
  • Click on the timeline, see your model pose and the red line appear.
  • Now click on that little Marker+ button
You'll notice it summons a pop up, in which you can choose a number of functions available to your model from a drop-down menu.

How It Works
What you're going to make is a special trigger INSIDE the animation-clip file that will call a script function. So you WILL need a receiving script on your model.

Watch the Wizard. See how when he pulls back, the fireball appears, then when he thrusts out his hand, it looses? These are triggered by Animation Events.

I wrote a quick script with two basic functions. 1) summon fireball stuck to hand and 2) lerp fireball toward enemy. The Animation Events then trigger these and viola! Fire-throwing mage!


____________________________________________________________

Important Notes:
  • If the Event icon is grayed out and you can't create one, this means the animation file is read-only. That's okay! 
    • Find the animation in your Project window and click on the clip. (again, little box with a "play" arrow in it). 
    • Ctrl-D to duplicate that little mofo. You'll see a copy of it OUTSIDE it's original model asset. You can edit this one. 
    • Replace the animation in your Animator with this new one so it'll work right. :D
  • If you use the same animation clip/animator with clip on a different model (one without the script with the event-function) an error will appear in your Editor. This is harmless.
____________________________________________________________

This post combined with it's older sibling comprise most of what I have learned in the last year about animation. Now I look forward into the "Intermediate" stage of 


  • Editing and possibly creating my own animation clips. 
  • Rigging and re-skinning models
  • Custom model mesh creation


I'll let you know when I figure those out. In the mean time, check out our Greenlight to see why I bothered to learn all this stuff in the first place.

___________________________________________________________


All blog posts by UnityGirl are inspired by my work with Brunelleschi: Age of Architects on the Aesop Games team. Download the current Unity client On IndieDB

Wednesday, April 22, 2015

Unity Tips: Animating Multiple Humanoid Models (Part 1)

If you've got more than one character model or, heaven forbid, NPCs, you'll probably be trying to rig multiple models with the same animations. I've come through the learning hump on this one and am here to help!

Also, my game is green-lighting! Check us (and my animation work) out! :D


____________________________________________________________

Mecanim Humanoid

These are your magic words. As long as all of your assets can be set to this setting, I can help you.

That said, here's what I got no non-Humanoid Models/Animations:

  • Cross-overs are not guaranteed, try to use animations that come with your models
  • You might be able to convert to Humanoid
____________________________________________________________

Models to Humanoid:


If you've got a humanoid model (head, hands, feet, general upright position) but it's not already set to Mecanim Humanoid, you are not hosed!

Find your base-model. Some packages come with a base and prefabs. This is the one with the model info in the Inspector when you click it.

  • In the model info in the Inspector, click "Rig"
  • Select "Humanoid" and "Create From This Model"
If your model was rigged in anything close to the standard way, Unity will take care of the rest. If there's anything wonky about you're rig, just go back to the Rig tab in the model and click "Configure".


____________________________________________________________

Configuring Your Humanoid

Warning: Not all animations are equal. Your model can be rigged correctly but an animation may still manipulate the bones wrong. Some animations are broken, and some will ONLY work properly with their original models.

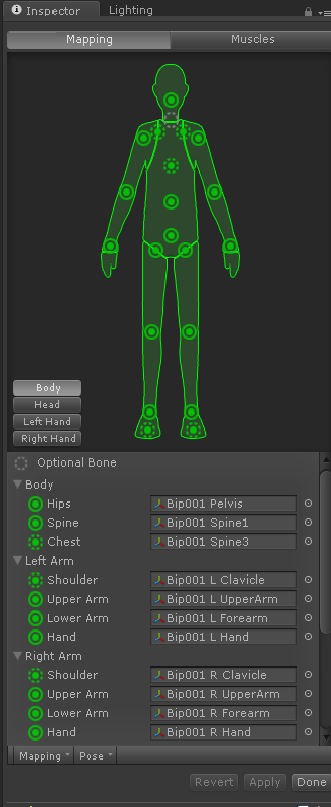
This shows you where Unity thinks the bones are. (Bones are what animations move around)
When you click "Configure" Unity will ask you to save any unsaved changes in your current scene. This is because we're jumping into a place-holder new scene to configure.

Check the settings and maker sure all the bones know where they are. If you find everything okay and make no changes, just load into anther scene and keep working.
If you DO make some changes, remember to click Apply then Done at the bottom.

____________________________________________________________

Fun Tip:
One of the model-packs I picked up had mouths that open and close. The animations that came with close the mouths, but most of my animations don't control that bone. Meaning any new animations caused their mouths to hang open, as if in enternal horror (not happy faces).

I solved this by going into the Configure settings and un-assigning the jaw bone. This set the mouths to the mesh-default closed state :D


____________________________________________________________

Configuring Your Animations

That's right, you're not actually -totally- stuck with the settings they came with. We're gonna set these to Mecanim Humanoid as well. If your animations were stored inside your imported model, they're already changed. If not, find the import object and select. You'll see a familiar Import Settings in the Inspector.

  • In the model info in the Inspector, click "Rig"
  • Select "Humanoid" and "Create From This Model"
It's that easy. Not all animations will work like this, but most of them do. Now you've got Humanoid models and Humanoid animations that should work together.

____________________________________________________________


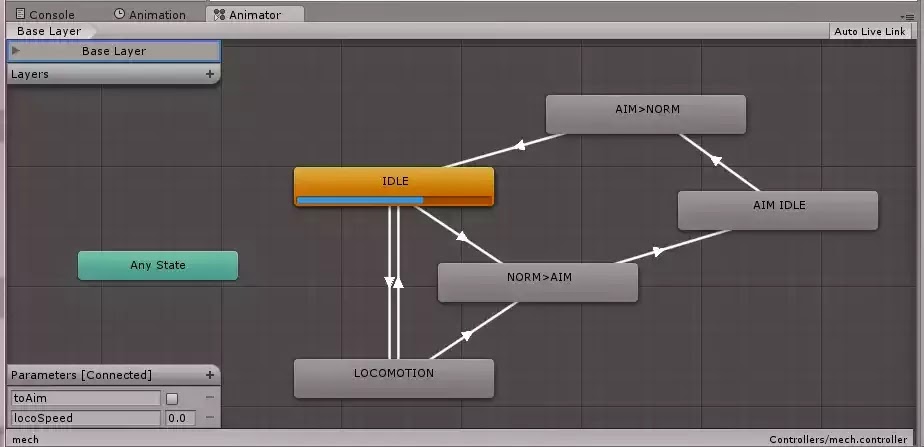
Animator Controller

While I have yet to master all of it's tricks, I love this little machine.

Setting Up Your Controller

Like most things in Unity, it's easy to create one of these. Just right-click in the Project window and select "Create" --> "Animator Controller"

Now you've got an empty animator. Find your Animation Clips (the asset INSIDE your imported assets with the little arrow on gray square), then drag them into your Animator.

Fun Fact:
If you then click on the gray animation boxes in your Animator, you can replace the clip WITHOUT replacing the box-entry by dragging a new animation-clip asset into the inspector slot.

Arrange the animations to your liking. Remember to set the one you want to play FIRST as your Default.

____________________________________________________________

Animating the Models

Wizard Breaks it Down

Here's the good part. One Animator Controller can apply to many models, letting players and NPCs have the same animations and respond to scripts the same way. Here's how we do it.

  • Animator component on Models(s)
  • In the Animator component. drop your new Animator Controller into the Controller slot
  • VERY IMPORTANT - Make sure the Avatar matches your Model. Trying to animate with the wrong model will not work.
  • Press Play

Finding Your Avatar

  • Locate your model asset, the one with the Import Settings we chaneged to Humanoid
  • There's a little arrow by that asset in the Project window, click it
  • The last asset listed under your model-asset should be your avatar
  • Drag that (little beige person icon) into your Animator component
DO NOT copy-paste the component onto a new model without replacing the avatar. The animation will not work unless the avatar matches the model.

Now all your models (if the animations work for them) can move together.

____________________________________________________________

Exceptions:

I'm not a model/rigging expert and bones beyond the Unity configure settings baffle me. I don't know why animations work on some models and not others, except that it probably has to do with how the bones are arranged and what the animations expect.
The mouth-open issue is a good example of a non-breaking incompatibility. Other failures I've seen include turned/backward limbs and, the most common, animations that cause the mesh to stretch badly or overlap itself unrealistically.

Stay tuned for Part 2: Working with Animations (for beginners)
___________________________________________________________


All blog posts by UnityGirl are inspired by my work with Brunelleschi: Age of Architects on the Aesop Games team. Download the current Unity client On IndieDB

Saturday, April 18, 2015

UnityGirl on Greenlight!


Y'all know that project all this blogging was for? We're on Greenlight!

____________________________________________________________


Aaaahhhhh!


It's been over a year of steady development, starting from absolute basics, but now my Unity client and demo scenes are front and center for the eyes and judgement of the greater steam community. Yeah, a little nerve-wracking, but also overwhelmingly exciting. What if it totally blows up and we've suddenly got thousands of players? What if it doesn't?

We've got an awesome video and we're ready to launch. Needless to say it's been a little epic around the studio today. We at Aesop Games invite you to make this amazing leap into the greater gaming industry with us. Take a few more seconds of your time and check us out.


If you like us, vote for us on Steam. If you're feeling generous, favorite and follow. However you feel about us, leave us a comment! Comments are awesome.
____________________________________________________________

New Features Galore!


Recently, like whiplash recently, we became MMO-capable. Since then everything's been downhill (the good kind) but 3 times as busy. No time for anything but shoving those features and demo features in as quickly as possible. Integrating the multiplayer functions and trying to last-minute polish my beginner assets has kept me too busy to worry about how busy the other 2 members of Aesop Games have been in preparation for this launch.

Between trying to continue development with the Oculus and learn the Kinect avatar control system, there's barely time to be a human. Which is pretty awesome.
____________________________________________________________

Future Unity Tips&Scripts


If you've been wondering why there aren't more tips and scripts, there just hasn't been time! Once it's locked down, I'd be happy to reveal how it was done step by step for the curious. Actually, the whole project is going to be open-sourced 3 years after launching because that's how gaming technology works now.

Until then, I'll be releasing the cool bits I think others will find useful through this blog.

____________________________________________________________


Back to the points, Check out the Greenlight! Please take take a few more seconds of your precious life and click some buttons. Let us know what you think!

If you got here before 4/22/2015, join the Thunderclap!