See how we made the pointer in post 1
Goal
Selection: plain and simple. Choosing between game objects, which way to look, and what to interact with. Mainly this post is about how to use a pointer moved by the mouse (last post) that sends clicks where you want them to go.
____________________________________________________________
Obstacles: |
| Note the curve, and how each eye sees further to one side |
Camera Distortion: It's important to keep in mind that the Oculus uses 2 in game cameras distorted together to simulate your eye-based vision inside the Rift. This also means that it's easy to aim at something with "one eye" and not really hit it within the distortion.
Mouse Function: I just haven't managed to get the windows mouse-pointer function in Unity to work inside the Rift. That said, OnMouseDown does work if referenced indirectly such as
public bool triggered;
void OnMouseDown () {
Application.LoadLevel("MyScene");
}
void Update () {
if (triggered) {
OnMouseDown();
}
}
I use this to have Oculus and regular mouse function in the same script with the same click-response code.
____________________________________________________________
How to Trigger: |
| Building text and highlight appear when building is triggered |
- Make a cube child object of the pointer named "PointCollider" (or whatever)
- give it a cube collider set to "Is Trigger" and a rigid body set to "Is Kinematic"
- transform it such that it makes a long thin line through pointer object on out into the world as far as you need. (make sure it goes far enough backward to tough the player)
- Put a collider and this snip of code on your click-responsive assets:
void OnTriggerEnter(Collider col) {
// this part keeps your script from responding to all collider interactions, only your pointer
if (col.transform.name == "PointCollider") {
triggered = true;
}
}
void OnTriggerStay(Collider col) {
triggered = true;
}
}
void OnTriggerExit(Collider col) {
if (col.transform.name == "PointCollider") {
triggered = false;
}
}
____________________________________________________________
I've done it slightly different in this JS example, using if (Input.GetMouseButtonDown(0)) because OnMouseDown is linked to a GUI confirmation irrelevant to the Oc player.
Raycasts
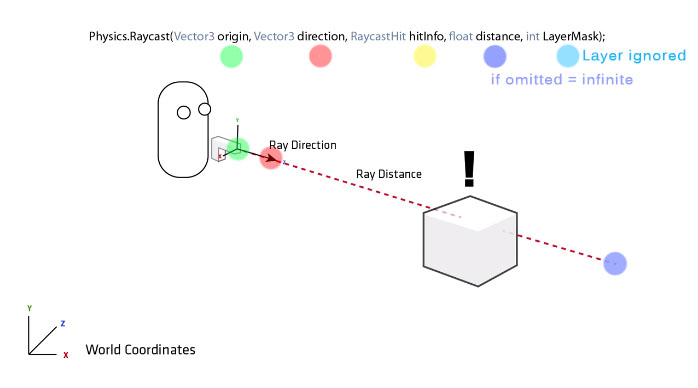
If you ask around about what to use for generic direction-based selection, much of the Unity community will suggest Raycasting. This is an invisible line you send out from a specified origin along a specified angle. If it hits something, it records what it hit.
Why I don't use them if I can help it:
a) conditionals for raycast hit can only be calculated in the script that sends the raycast. This means that
- button-like scripts are useless
- trigger area scripts are useless
- you are mostly reliant on tag-management to sort your responses
- effecting other objects is a logistical pain
b) selecting what the raycast hits is a pain in the butt.
c) programming for Raycasts involves programming with catcher-scripts or backward-pointers that I find not-so-fun.
They are the only way (that I know of) to select a point on a TEXTURE and not just a gameObject. Therefore we will be using a Raycast to handle the Web Vewier later.
____________________________________________________________
Wanna see how your Oculus pointer can select specific points on a Coherent UI web view? Tune in to final post of this trilogy next time! :D
____________________________________________________________
All blog posts by UnityGirl are inspired by my work with Brunelleschi: Age of Architects on the Aesop Games team. Download the current Unity client On IndieDB


Thank you for this!
ReplyDeleteHello,
ReplyDeletethis is very interesting stuff, please continue :-)
Can i have permission to sure you raycast explanation image? (https://lh6.googleusercontent.com/proxy/UXo-ryYQMpcQeJS3DUYywJEFywxrfZImLFLv-bR4QAWjENTkxlzVPsXC0XDqmS8D9ZeXpqIGf6aV69UzatMd0kB187voQZ4JWqe4ODL_KlvSpfM94kAWb7bOCU3cxUj3Pv_yBw=s0-d) I need it for some university work.
ReplyDelete