
____________________________________________________________
We'll be covering three major tricks I've learned.
- Animator Controllers
- Transition Parameters
- Transition Blending
- Individual Animations
- Animation Events
____________________________________________________________
Animator Parameters and Transitions
[Animator Documentation]Parameters
[Parameter Documentation]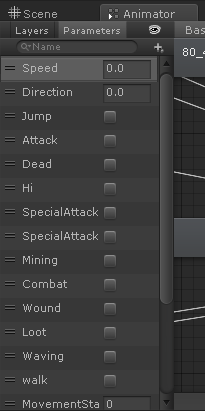 If you're used to working with the Legacy system, these will be quite comfy. Parameters are bools, ints, floats, and triggers that you can assign to an animation transition and set with scripting.
To set up a parameter, open your Animator window. At the top, you'll see two tabs. Layers and Parameters. Simple enough, click over and add your first. I tend to work mainly with bools, but floats are very useful for speed-based transition amd ints can be used/set by switch-type scripting but the discretion is really up to you.
An example of this set up is
- bool - InCombat
- bool - Attacking
- bool - GetHit
To change these, you want a script that looks something like this:
public GameObject me;
public Animator anim;
public bool Combat;
 void Start() {
me = this.gameObject;
anim = me.GetComponent<Animator>();
}
void Update() {
if (Combat) {
anim.SetBool("InCombat", true);
} else
anim.SetBool("InCombat", false);
}
}
And so on like that with all the types. This allows you to control your animation transitions through your own scripting, rather than just watching a loop of default transitions.
____________________________________________________________
Transitions - The Line
To make a transition:
- Right-click on starting animation in Animator. Select "Make Transition".
- Now click on the animation you want to transition to.
The next part is cool. Now click on the Line-with-an-arrow that was created. This is your transition.
In the Inspector, you'll see the details of the transition. These settings determine the when and how of the transition. There are two tricks in this display I'm going to cover.
____________________________________________________________
The first is Conditions, seen at the bottom. This is where we use your Parameters. Click the +
Now you've got a drop-down menu including any Parameters you've created, and options as to what conditions the parameter must be in to trigger the transition.
So to trigger a transition into combat from the previous example:
- Lick Parameters in your Animator and then click the +
- Create a bool called InCombat
- Place Idle and Combat Idle animations into your Animator
- Right click on Idle and select "Make Transition"
- Click on Combat Idle. You'll see the arrow pointing from Idle to Combat Idle
- Click on the arrow/line to see the info in the Inspector
- Click the + under Conditions and select "InCombat". Set the condition to "true"
- Now create a transition from CombatIdle to Idle
- Set this transition's Condition to "InCombat" and "false"
Now, when your script says you're in combat, your animation will change from Idle to Combat Idle. When you leave the combat state, your model will relax back into their Idle animation.
____________________________________________________________
Transitions - The Details
The second item in the Transition Inspector is blending. I'm not actually sure what the official Unity term is, but I'm talking about that little blue and gray chart-thing.
In application, I've found many animations start with the model standing still for a second or two before acting. By having the transition start later in the animation, you can skip bits that are not useful to you.
Second common application: Free animations often come in roughly cut samplers. If you want a particular action that happens in the middle/end of your animation clip, just slide that lower bar over.
____________________________________________________________
Animation Events
Animation events allow you to trigger script functions at certain points in the animation without having to count seconds.
This sequence was accomplished with a super cool trick I just learned called Animation Events.
To find this option:

- Place your model in a scene and select
- Open your Animation window (Window-->Animation)
- Click on the timeline, see your model pose and the red line appear.
- Now click on that little Marker+ button
You'll notice it summons a pop up, in which you can choose a number of functions available to your model from a drop-down menu.
How It Works
What you're going to make is a special trigger INSIDE the animation-clip file that will call a script function. So you WILL need a receiving script on your model.
Watch the Wizard. See how when he pulls back, the fireball appears, then when he thrusts out his hand, it looses? These are triggered by Animation Events.
I wrote a quick script with two basic functions. 1) summon fireball stuck to hand and 2) lerp fireball toward enemy. The Animation Events then trigger these and viola! Fire-throwing mage!
____________________________________________________________
Important Notes:
- If the Event icon is grayed out and you can't create one, this means the animation file is read-only. That's okay!
- Find the animation in your Project window and click on the clip. (again, little box with a "play" arrow in it).
- Ctrl-D to duplicate that little mofo. You'll see a copy of it OUTSIDE it's original model asset. You can edit this one.
- Replace the animation in your Animator with this new one so it'll work right. :D
- If you use the same animation clip/animator with clip on a different model (one without the script with the event-function) an error will appear in your Editor. This is harmless.
____________________________________________________________
This post combined with it's older sibling comprise most of what I have learned in the last year about animation. Now I look forward into the "Intermediate" stage of

- Editing and possibly creating my own animation clips.
- Rigging and re-skinning models
- Custom model mesh creation
I'll let you know when I figure those out. In the mean time, check out our Greenlight to see why I bothered to learn all this stuff in the first place.
___________________________________________________________

All blog posts by UnityGirl are inspired by my work with Brunelleschi: Age of Architects on the Aesop Games team. Download the current Unity client On IndieDB
"Lick Parameters in your Animator and then click the +..."
ReplyDeleteLooks so cool i wonder if "Lick" is a typo after all